Wedding Slideshow

Wednesday, October 28, 2009

What Makes A Photograph Great?

I recently read the following on the photo.net online discussion forum:

Question: “What makes a photo a fine art work (that is, special or good)?”
Answer: “When you say it is. The better answer is when others say it is.”1

While speaking in simple terms this is correct, surely we can explore the topic a little more deeply to find more significant answers to what makes a photograph great. According to iconic landscape photographer Ansel Adams, “A great photograph is one that fully expresses what one feels, in the deepest sense, about what is being photographed.2

Let’s refine our search a little and ask ourselves some questions. The first question we should be asking is what is the subject of the photograph or image? The most common problem encountered when attempting to create a great image is not establishing an obvious subject. Try to imagine what subject another person might see (if any) while viewing your photograph.

Is the photograph composed in an appealing way? Composition is probably the most elusive concept in photography because it is subjective (what one person likes another person may not) and because the rules of composition are concrete. Here are some important composition concepts to keep in mind:

Simplicity. Don’t try to over-complicate your image with distractions or too much subject matter. The subject of what you are photographing should be clear.
Framing. Try to fill the image frame and make sure there are no voids within your image. There are exceptions to the rule, but there shouldn’t be open space that distracts from the subject.

Law of thirds. If you imagine your camera viewfinder as a tic-tac-toe-like grid where space is divided into thirds, it is considered more pleasing to the eye to place your subject where third lines intersect (instead of splitting your
image in half).
 
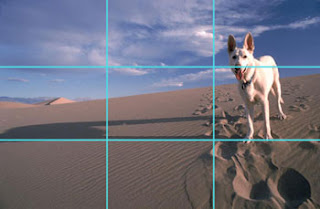
Photo Courtesy of Microsoft Corporation
Leading lines. Are the viewer’s eyes guided through the photograph to the focal point? Examples might be railroad tracks, highways, bridges, buildings and more.
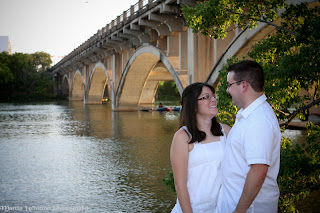
Perspective. How your subject appears to the viewer determines perspective. Many times your subject can determine perspective as well. Here are some beautiful Examples of Different Perspectives3 which might better illustrate the concept.
Focus and exposure. Make sure your subject is in focus and exposed correctly. If everything else mentioned here is correct, but focus or exposure is not correct, your photograph’s message will likely be lost.4

There are more compositional ideas that were not discussed, but hopefully these give you some foundation to build upon. Now comes the overarching questions. Does the photo tell a story? Does it elicit emotion? Is there an inherent creativity about the image? Is it appealing to people from all walks of life? 


If you’ve followed the compositional rules for photography laid out above, and you can answer the aforementioned questions with a resounding “yes”, then you’ve probably created a great photo. If taking good photographs were easy then you wouldn’t be reading an article about it. Every good photographer takes bad photos; what separates the good from the bad is continuous practice and always maintaining the personal resolve to capture a better photograph. Perhaps that is what defines a passion for photography.
To provide you with some photographic perspective and a starting point I’ll leave you with a quote. As legendary French photographer Henri Cartier-Bresson once stated, Your first 10,000 photographs are your worst.”5

So how many photographs have you taken today?

Martin Whitton is a professional wedding photojournalist who lives and works in Austin, Texas. See regular updates on Martin’s work at  http://txweddings.blogspot.com/Additional wedding photographs, bio and more can be viewed at http://www.mwwphoto.com/

Sources:
3. What makes a photo good? A Basic Checklist for Evaluating Photo Quality by Charlotte K. Lowrie. http://wordsandphotos.org/Commentary/WhatMakesAPhotoGood.htm
5. Digital Photography School. 10 Photography Quotes that You Should Know. http://digital-photography-school.com/photography-quotes


Monday, October 19, 2009

What is Depth of Field (DOF)?

What is Depth of Field (DOF)?

According to Dictionary.com DOF is,

the range of distances along the axis of an optical instrument, usually a camera lens, through which an object will produce a relatively distinct image.” 1

Viewing both almost identical images you can see a demonstration of two very different DOFs. In the top image, moving left to right, you can see that most of the planks in the fence are relatively sharp and in focus throughout the photo. This would be considered a large DOF. In the bottom image only the very center of the image appears to be in focus. The fence planks to the left and right of center are out of focus, creating a shallow DOF. Each image is also labeled with it's respective aperture (f-stop).


In not-so-technical terms DOF is everything that is considered to be “in-focus” or sharp in a captured image or photograph. Consider the two black & white images below...

So what’s going on inside the camera and lens to create these two separate images?

First, we need to quickly understand what aperture means. Without going off on a technical tangent here we know that as a rule of thumb, aperture is determined by how wide the iris of the camera lens opens when the shutter button is pressed (see black and white figure below). Larger apertures (think larger opening, more light) create shallower depths of field; inversely, smaller apertures (think smaller opening, less light) create deeper depths of field. A large aperture where the iris is open very wide might be f-1.2 or f-1.4. An example of a very small aperture might be f-222.

The primary difference between these two wood fence images is the aperture (f-stop) at which the camera lens is set. Even if we didn’t have the metadata at our fingertips that would tell us the exact aperture that was selected for each photo, we could still hypothesize that the top image was captured at a small aperture (small f-stop), perhaps f-11 or f-15. The bottom image was likely captured at a large aperture (large f-stop), perhaps f-2.0.


Predicting DOF. DOF can be calculated based on three primary factors (and one secondary factor): focal length of lens (50 mm, for example), aperture or f-stop (f 2.0, for example) and subject distance (distance between camera lens and subject). The secondary factor affecting DOF is your camera; different digital cameras have different sensors and components which affect DOF. If you would like to calculate DOF for your camera and lens combination you can easily do so by imputing the three primary factors mentioned above here on the fantastic online DOF calculator graciously provided by Don Fleming of Dofmaster.com3.

Using Don’s DOF calculator I compared two of my favorite lens/camera combinations: the Canon 5D Mark ii + 50 mm prime lens with the Canon 40D + 50 mm prime lens. The factors I used were 50 mm focal length, 2.0 f-stop and 10 ft subject distance. The results:

Canon Camera
Lens Focal Length (mm)
F-Stop (Aperture)
Subject Distance (ft)
Calculated Depth of Field (ft)
5D Mark ii
50
2.0
10
1.45
Canon 40D
50
2.0
10
0.91

The differences in DOF from these two examples are significant: 0.14 (ft) [1.45 – 0.91 = 0.14 ft], which is approximately 6-7 inches in difference. I’d rather not cover too much detail here on why and how this works, primarily because I don’t pretend to be an expert in how camera sensors work or in mathematics. For the purposes of this article you only need to know that every digital camera is different and it might be worthwhile for you to bookmark the DOF calculator link for future reference.


So why do we care about DOF?

DOF and blurring created in any image is subjective and will vary from one photographer to another. Where art and science collide there can be no one rule that is never broken. In many cases photographers simply photograph a subject or event in a way that they choose to interpret it, regardless of whether another person may like the image that is captured. My rule (in general) is for the foreground to be in focus and background to blur. However there are always exceptions and the rule of universal appeal supersedes everything else; Can I answer “yes” to the question, “does the image have a general appeal about it and is it pleasing to view? Hopefully so.


If you would like more information on DOF check out the Depth of Field Video Tutorial recommended from one of the Adobe Photoshop Bloggers from The Genesis Project at Adobe.

1. Modern Language Association (MLA): "depth of field." Dictionary.com Unabridged. Random House, Inc. 14 Oct. 2009.  http://dictionary.reference.com/browse/depth of field>.

3. Depth of Field Master. http://dofmaster.com

Thursday, October 15, 2009

What is the heck is bokeh?

Wikipedia defines bokeh as,

“a photographic term referring to the aesthetic quality of the out-of-focus areas of an image produced by a camera lens using a shallow depth of field.[1] Essentially, bokeh is an aesthetic and qualitative measure of light distortion in the out-of-focus areas of an image, and is primarily caused by lens aberrations and aperture shape.”

Wikipedia goes on to explain that bokeh is taken from a Japanese word (boke), which can be interpreted as “blur” or “haze”.


In short, I just wanted to create a lead-in to the topic I’ll be writing about in the next week: Depth of Field (DOF). In a way, bokeh is the “Yin” to DOF’s “Yang”, if you will. Or perhaps bokeh could be considered the boundary that delineates where DOF begins.

At any rate, the photo above shows a flower in the foreground that is the focal point of the image. Most of the image that remains is a blurred background or bokeh. The photo is from a Zilker Botanical Garden wedding I photographed earlier this year here in Austin. More on the topic of Depth of Field in the coming days…

Sources:

Thursday, October 8, 2009

How Do I Pin A Corsage?...Fold A Handkerchief?...Tie A Tie?

Below are some great links on how to do stuff you may not think of until wedding day. This might seem pretty simple at first, but when you are feeling a little stressed and emotional on wedding day having this information either committed to memory or printed on a piece of paper will seem like a wise thing. The other wedding participants will be thankful and you’ll look like an experienced pro!


I must give credit where credit is due: Thank you ehow.com for the great wedding information!

Tuesday, October 6, 2009

My 10 Rules For Editing Digital Wedding Images


A number of people (including my associate photographers) have inquired recently about how I edit images and what I do to alter images after a wedding. In an ideal world I would do nothing to the images during the "post processing" session; however, we live in a world where weddings happen on the fly. Quantity of light increases, decreases or disappears, we move from outdoor to indoor (or vice-versa) and action is constantly unfolding in an environment that is anything but static. As a result, I like to tweak or make slight adjustments to my images after the big event has ended to compensate for what the camera (or photographer) didn't do perfectly the first time. This is a summary of 10 things or rules that are always bouncing around in my head during the editing process.


Martin’s 10 Rules for Editing Digital Images.

1. Tone of space (a room, for example) should be balanced and neutral, with no overall 
bias;
2. Blacks (like tuxes) should be black;
3. Whites (like wedding gowns) should be white;
4. Don’t over-saturate images (my personal pet peeve)! Final edited image     should be representative of what the human eye saw when photographing occurred;
5. Flesh tones should be realistic and consistent. If he looks red and she looks pale white, something’s probably wrong;
6. Image should be level or straight. Use reference points within image to determine this;
7. Fix and remove any “red-eye” issues when flash is used;
8. Sharpen all images last, and do it sparingly;
9. Save images based on their intended use; images being  posted online can be as small  as 500 kb. Images that will be printed should probably be 1-2 mb (minimum);
10. For easy tracking and identification, rename/save images based on the event, like – “Jane & John Wedding 1”.

These ideas may seem a little elementary, but sticking to the basics keeps our editing focused, maintains consistency from image to image and keeps our clients happy. 


Saturday, October 3, 2009

Find the Right Wedding Photographer - 10 Guidelines to Help You in Your Search

Finding a wedding photographer can be a daunting task given the sheer number of photographers in large Texas Cities like Dallas, Austin & San Antonio; A search of the Austin, Texas Yellow Pages yields over 393 professional photographers alone! And let's not forget the "weekend warrior" photographer, who operates off of the photography grid and whose numbers can only be estimated. So how does a bride find the right photographer in a sea of wedding vendors?

Here are some suggestions:

1. Referral = 1st hand experience. If you know someone who got married recently then make this your first lead. Check out the photographer's website or portfolio and talk to bride/groom who hired them. If you like a particular photographer's work and he/she gets a favorable review, make an appointment to meet with them. If you like a photographers work that you've found elsewhere, don't be afraid to ask for references.

2. Pick a photographer based on his/her style. If you like his/her photos from past weddings, then you'll probably like the photos they capture at your wedding! Find out what is the photographer's primary style? Traditional posed shots? Candid or artistic? Photojournalistic? Other? Then decide which style you like best.

3. Try not to meet with too many photographers. Ideally you will want to select less than 5 wedding photographers in your area whose style you like and who are in your price range (don't be afraid to ask this question when telephoning). Meeting with too many photographers will get confusing and will likely be counterproductive to your search.

4. Do you like the photographer you met with? This is the person that will be following you around for hours photographing you, your fiance and family/friends on your big day. Be sure it's someone that you feel at ease with; otherwise your uneasiness will show up in the photos.

5. Ask to see images from an entire wedding (start to finish). Just about anyone can put together a slideshow of good pictures they have taken over the years. But a professional wedding photographer can capture great photos from every segment of a single wedding - bride dressing beforehand, ring exchange, kiss, formals, 1st dance, bouquet toss, etc.

6. Request a wedding day photo schedule. One element (possibly the most important) of wedding photography that is frequently overlooked is the Wedding Day Photo Schedule, which details when shooting begins/ends (i.e., number of coverage hours), who will be photographed during formal photos and provides a specific time line for each wedding event that will be photographed. If the photographer doesn't provide one, then request it - it will be invaluable.

7. Is there a limit to the number of photos captured? Find out how many photos the photographer estimates will be captured on wedding day and how many photos will be provided after image selection/editing. Most photographers who use digital cameras can give you an estimate based on the number of hours of coverage provided at the wedding.

8. Do you get a CD with full-sized images? Many photographers are reluctant to provide you images from your wedding on CD, even though you may pay them handsomely for covering the event. Ask about getting the images on CD and if this costs extra.

9. Inquire about back-up cameras and equipment. Does the photographer you are meeting with have back up equipment in the case that his/her equipment malfunctions or fails? Professionals will frequently have on hand 2-3 cameras, numerous lenses, and at least 2 of everything else. Wedding photographers always have to be prepared for the unexpected!

10. Beware of inexpensive photographers. The old saying "you get what you pay for" is applicable when it comes to wedding photography. If someone posting on Craig's List offers to shoot your wedding for $250, it's probably b/c they are new to photography. If your wedding budget doesn't allow you to hire a professional and you think that photographs from wedding day aren't that important, then hiring an amateur may be OK. However, if images from the big day are important to you, then don't skimp on photography; hire an experienced professional. You'll be glad you did.


Sources:
1. www.yellowpages.com/categories/Austin-TX/photography, 2009.